|
Where are you currently Building?
Please see the following page - Locations.
What do I need to know about my new home?
Please see the New Home Orientation Information below.
How do I get warranty service?
If you do not find your answers on this page, please check your warranty booklet which you were given at closing. You can also click this link to view the current New Mexico Warranty from Residential Warranty Corporation.
NEW HOME ORIENTATION INFORMATION
Smoke Detectors
Your new home comes equipped with smoke detectors. There is one located in each bedroom and in other locations as required for your safety.
The smoke detectors in your home are powered by your home’s electrical system with a battery backup.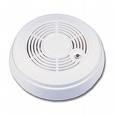
It is important that you clean and maintain and test your smoke detectors.
Clean dust off the detector regularly and carefully.
Test the detector frequently by pushing the little button on the bottom.
Install fresh batteries in your smoke alarms at least once a year.
Don’t allow anyone to “borrow” the batteries from your smoke alarms. If the power fails the batteries are the source of power for the detection and alarm.
If a smoke alarm’s warning alarm sounds, don’t panic. Stay close to the floor and get out of the building. Before opening any doors, check the temperature. If the door feels hot to the touch don’t open it.
http://www.ul.com/consumers/smoke.html
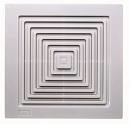 Ventilation Fans Ventilation Fans
Many people ask the question – Do I need to use the ventilation fans in my new home? The answer is YES!
Energy efficient construction requires that you use your ventilation fans w hen you are creating any form of moisture. This includes bathing, showering, cooking, and laundry.
Trapping moisture in your home decreases the energy efficiency of your heating/cooling system (your HVAC system removes moisture) and can create moisture and mold problems. The warm steamy bathroom may feel great but get the moisture out of your home.
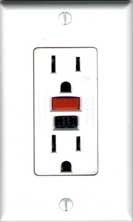 GFCI (Ground Fault Circuit Interrupters) GFCI (Ground Fault Circuit Interrupters)
GFCI outlets are installed in your new home in areas that could be exposed to water “wet areas”(kitchen, bath, laundry, garage, outside). A GFCI outlet is often installed as the first outlet in a series of outlets to help prevent electrical accidents in areas where water and electricity are near each other. This means that one GFCI outlet may trip “cut off power” to several outlets on that circuit.
If you loose power in a wet area of the home look first for a “tripped” GFCI outlet. Press the "Reset" button to restore electrical power.
If resetting the GFCI outlet fails to restore power check to see if there is a damaged cord or appliance or an item connected to a GFCI protected outlet that is exposed to water or moisture. Unplug anything that appears damaged or moist. Try resetting the breaker in the circuit breaker box.
"Ground faults" are often the result of damaged appliance cords or consumers who use electrical products in wet environments, such as bathrooms or swimming pool decks. By installing GFCIs in every home in the United States, the U.S. Product Safety Commission (CPSC) estimates that more than two-thirds of the approximately 300 electrocutions occurring each year could be prevented. The advantage of using GFCIs is that they detect even those amounts of electricity too small for your fuse or circuit breaker to activate and shut off the circuit.
Like all products, GFCIs can be damaged. GFCIs damaged by lightning or electrical surges may fail to provide adequate protection. A simple test once a month and after any violent thunderstorm should be conducted.
To properly test GFCI receptacles in your home:
· Push the "Reset" button located on the GFCI receptacle, first to assure normal GFCI operation.
· Plug a nightlight (with an "ON/OFF" switch) or other product (such as a lamp) into the GFCI receptacle and turn the product "ON."
· Push the "Test" button located on the GFCI receptacle. The nightlight or other product should go "OFF."
· Push the "Reset" button, again. The light or other product should go "ON" again.
If the light or other product remains "ON" when the "Test" button is pushed, the GFCI is not working properly or has been incorrectly installed (miswired). If your GFCI is not working properly, call a qualified, certified electrician who can assess the situation, rewire the GFCI if necessary or replace the device.
"GFCIs are proven lifesavers, however, consumers need to take a few minutes each month to do this simple test. By taking action, you can help protect your family from the risk of electric shock," says John Drengenberg, UL Consumer Affairs Manager.
Several types of GFCIs may be installed in/around your home. Look for the UL Mark on GFCIs when purchasing them or when specifying the product to your electrician.
Wall Receptacle GFCI -- This type of GFCI -- the most widely used -- fits into a standard outlet and protects against ground faults whenever an electrical product is plugged into the outlet. Wall receptacle GFCIs are most often installed in kitchens, bath and laundry rooms, and out-of-doors where water and electricity are most likely to be in close proximity.
Circuit Breaker GFCI -- In homes equipped with circuit breakers, this type of GFCI may be installed in a panel box to give protection to selected circuits. Circuit breaker GFCIs should also be checked monthly. Keep in mind that the test will disconnect power to all lights and appliances on the circuit.
http://www.ul.com/consumers/groundfault.html
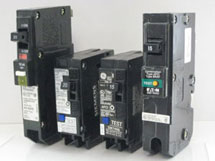
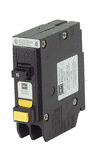 AFIC (Arc Fault Interruption Circuit) AFIC (Arc Fault Interruption Circuit)
Your new home comes equipped with AFIC breakers located in the circuit breaker box.
Most people are familiar with the term arcing. Arcing may be intended, such as with an arc welder or unintended, such as when a tree falls on a power line during a storm creating a current discharge between conductors or to the ground.
An arc fault is an unintended arc created by current flowing through an unplanned path. Arcing creates high intensity heating at the point of the arc resulting in burning particles that may easily ignite surrounding material, such as wood framing or insulation. The temperatures of these arcs can exceed 10,000 degrees Fahrenheit.
Why do we really need Arc Fault Circuit Interrupters (AFCIs)?
 Smoke alarms, fire extinguishers and escape ladders are all examples of emergency equipment used in homes to take action when a fire occurs. An AFCI is a product that is designed to detect a wide range of arcing electrical faults to help reduce the electrical system from being an ignition source of a fire. Conventional overcurrent protective devices do not detect low level hazardous arcing currents that have the potential to initiate electrical fires. It is well known that electrical fires do exist and take many lives and damage or destroy significant amounts of property. Electrical fires can be a silent killer occurring in areas of the home that are hidden from view and early detection. The objective is to protect the circuit in a manner that will reduce its chances of being a source of an electrical fire. Smoke alarms, fire extinguishers and escape ladders are all examples of emergency equipment used in homes to take action when a fire occurs. An AFCI is a product that is designed to detect a wide range of arcing electrical faults to help reduce the electrical system from being an ignition source of a fire. Conventional overcurrent protective devices do not detect low level hazardous arcing currents that have the potential to initiate electrical fires. It is well known that electrical fires do exist and take many lives and damage or destroy significant amounts of property. Electrical fires can be a silent killer occurring in areas of the home that are hidden from view and early detection. The objective is to protect the circuit in a manner that will reduce its chances of being a source of an electrical fire.
How is an Arc Fault detected?
Unlike a standard circuit breaker detecting overloads and short circuits, an AFCI utilizes advanced electronic technology to “sense” the different arcing conditions. While there are different technologies employed to measure arcs by the various AFCI manufacturers, the end result is the same, detecting parallel arcs (line to line, line to neutral and line to ground) and/or series arcs (arcing in series with one of the conductors).
How does arc fault detection work? In essence, the detection is accomplished by the use of advanced electronic technology to monitor the circuit for the presence of “normal” and “dangerous” arcing conditions. Some equipment in the home, such as a motor driven vacuum cleaner or furnace motor, naturally creates arcs. This is considered to be a normal arcing condition. Another normal arcing condition that can sometimes be seen is when a light switch is turned off and the opening of the contacts creates an arc.
A dangerous arc, as mentioned earlier, occurs for many reasons including damage of the electrical conductor insulation. When arcing occurs, the AFCI analyzes the characteristics of the event and determines if it is a hazardous event. AFCI manufacturers test for the hundreds of possible operating conditions and then program their devices to monitor constantly for the normal and dangerous arcing conditions.
How does an AFCI work?
In essence, the detection is accomplished by the use of advanced electronic technology to monitor the circuit for the presence of “normal” and “dangerous” arcing conditions. Some equipment in the home, such as a motor driven vacuum cleaner or furnace motor, naturally create arcs. This is considered to be a normal arcing condition. Another normal arcing condition that can sometimes be seen is when a light switch is turned off and the opening of the contacts creates an arc.
What is the difference between and AFCI and Ground Fault Circuit Interrupter (GFCI)?
There is a major difference between the functioning of an AFCI as compared to a GFCI (Ground Fault Circuit Interrupter). The function of the GFCI is to protect people from the deadly effects of electric shock that could occur if parts of an electrical appliance or tool become energized due to a ground fault. The function of the AFCI is to protect the branch circuit wiring from dangerous arcing faults that could initiate an electrical fire.
AFCI and GFCI technologies can co-exist with each other and are a great complement for the most complete protection that can be provided on a circuit.
Testing an AFCI?
AFCIs are tested after installation to make sure they are working properly and
protecting the circuit. Subsequently, AFCIs should be tested once a month to make sure
they are working properly and providing protection from fires initiated by arcing faults.
A test button is located on the front of the device. The user should follow the instructions
accompanying the device. If the device does not trip when tested, the AFCI is defective
and should be replaced.
http://www.afcisafety.org/qa.html
Plumbing System
Your home is plumbed with PEX tubing with a Manabloc manifold or a manifold configured whole house system. The manifold type plumbing system equalizes pressure, making it possible to use multiple fixtures simultaneously without dramatic temperature or pressure changes and uses less water and conserves more energy.
Main Shut Off Valve
If you want to turn the water off to everything in your home the best place to shut it off is at the water meter. Find the water meter and shut off valve before you experience a leak.
If you want to shut off the water to a single appliance:
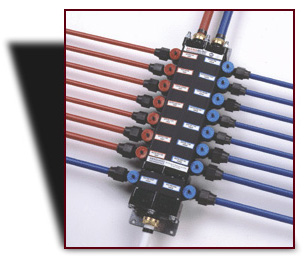 With the Manabloc, locate the manabloc manifold usually located in the laundry room or garage, use the manabloc key to turn the valve ¼ of a turn 90 degrees. With the Manabloc, locate the manabloc manifold usually located in the laundry room or garage, use the manabloc key to turn the valve ¼ of a turn 90 degrees.
 With a Manifold configured whole house system (if you don’t have a Manabloc), the shut off valve for each appliance is located next to that appliance (for instance under the sink or under the toilet tank). With a Manifold configured whole house system (if you don’t have a Manabloc), the shut off valve for each appliance is located next to that appliance (for instance under the sink or under the toilet tank).
What is PEX?
 PEX is cross-linked polyethylene. Through one of several processes, links between polyethylene molecules are formed to create bridges (thus the term "cross-linked). This resulting material is more durable under temperature extremes, chemical attack, and better resists creep deformation, making PEX an excellent material for hot water and other applications. PEX is cross-linked polyethylene. Through one of several processes, links between polyethylene molecules are formed to create bridges (thus the term "cross-linked). This resulting material is more durable under temperature extremes, chemical attack, and better resists creep deformation, making PEX an excellent material for hot water and other applications.
How long has PEX been used?
PEX was developed in the 1960s. PEX tubing has been in use in many European countries for plumbing, radiant heating and snow melt applications since that time. PEX was introduced in the United States in the 1980s, and has seen significant growth in market demand and production.
What are recommended uses for PEX?
PEX 's flexibility and strength at temperatures ranging from below freezing up to 200 degrees Fahrenheit makes it an ideal piping material for hot and cold water plumbing systems, service lines, hydronic radiant heating systems, snow melting applications, ice rinks and refrigeration warehouses.
Why is PEX an excellent piping material for plumbing?
PEX is ideally suited for potable water plumbing applications. It is flexible, making it easy to install and service. PEX is able to withstand the high and low temperatures found in plumbing and heating applications, and is highly resistant to chemicals found in the plumbing environment.
Flexible systems are quieter than rigid piping. The smooth interior will not corrode which can affect other materials long term pipe flow characteristics. PEX is also very freeze- break resistant. PEX systems have fewer joints and are easier to install providing a lower cost installation over traditional plumbing materials.
How can I be sure that PEX is a safe product for plumbing?
PEX is manufactured and tested according to stringent national consensus standards: ASTM F 876, F 877, AWWA C904 and CSA B137.5. Both the product manufacturer and independent third party testing agencies conduct routine quality control and quality assurance evaluations to insure the product meets ASTM, ANSI/NSF International and CSA Standards. Compliance with the standards ensures the end user of safety and quality. Additionally, PEX is included in all of the major model plumbing codes used in the United States and Canada; NPC, UPC, IPC and NSPC, and approved by HUD for hot and cold potable water plumbing use.
http://www.ppfahome.org/pex/faqpex.html
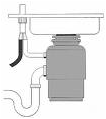 Garbage Disposal Garbage Disposal
The garbage disposal unit is located under the kitchen sink. It can be placed on either the left or right bowl of the sink. The switch to operate th e disposal is generally located near the sink. To run the disposal turn the cold water on into the bowl that has the disposal then turn the switch on.
The disposal is generally plugged into the outlet located under the kitchen sink. The top outlet is usually the proper outlet to plug the disposal into as the power to it is switched on and off by the swiitch. The bottom outlet is usually powered all the time and used to connect the dishwasher if the dishwasher is not hardwired to the electrical system. You will know that you have the disposal connected to the wrong part of the outlet if it continuously runs and cannot be shut off with the switch.
When the disposal gets jammed:
STEP 1: Turn the garbage disposal on and off quickly and check to see if it has power. If it hums, the power is on but the impeller is jammed. Move on to step 3. If it doesn't hum, it may have overheated and tripped a circuit breaker. Move on to step 2.
STEP 2: Restore power to the machine. Most disposals have an overload switch that trips when the motor starts to overheat. To reset the switch, look for a small red button on the bottom of the housing, and if it's there, push it in (see A). If your disposal doesn't have an overload switch or the machine still won't run after you reset the switch, reset the circuit breaker that serves the disposal.
STEP 3: Clear the jam from underneath. On many disposals, you can insert a 1/4-inch (6-mm) Allen (hex) wrench into the bottom of the housing and manually move the motor shaft and flywheel to dislodge the jam. If your disposal has an opening for an Allen (hex) wrench, insert the wrench and move it back and forth until the motor and flywheel turn freely.
STEP 4: Clear the jam from above. Press the end of a short broomstick against one of the impellers, and jab in one direction and then the other until the jam breaks loose (see B).
STEP 5: Remove the debris. Turn off the circuit breaker that controls the garbage disposal. Reach inside with a pair of long-nose pliers and pull out whatever jammed the machine.
STEP 6: Turn on the cold water--this hardens any grease inside and helps the disposal chop it up--and run the disposal until all the remaining garbage is gone.
http://www.ehow.com/video_112319_fix-jammed-garbage.html
Dishwasher and Dishwasher Air Gap
The dishwasher is usually hardwired to the electrical system or plugged usually into (the always hot) bottom outlet under the kitchen sink. (The top outlet usually is switched on and off for the disposal).
The dishwasher has a water shut off valve under the kitchen sink and it drains through the air gap on top of the sink into the side of the disposal.
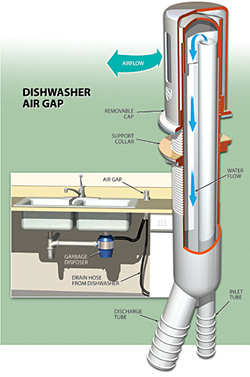 The air gap prevents wastewater backflow from entering the dishwasher and the potable water supply. Here's how it works. The bottom of the air-gap assembly has two plastic tubes. The drain from the dishwasher is connected to the smaller tube--water from the dishwasher is pumped up through it and shoots against the cap. Then, the water falls through the larger tube and drains toward the garbage disposer. The air gap prevents wastewater backflow from entering the dishwasher and the potable water supply. Here's how it works. The bottom of the air-gap assembly has two plastic tubes. The drain from the dishwasher is connected to the smaller tube--water from the dishwasher is pumped up through it and shoots against the cap. Then, the water falls through the larger tube and drains toward the garbage disposer.
The device provides airflow and thereby prevents a vacuum from causing a reverse flow of water. An air gap can become clogged, but it is easy to clean. It doesn't have to be replaced. To do this, unscrew its chrome cover, then unscrew the cap below it (sometimes the cap is just a pressure fit). Clean out debris that is preventing proper airflow or drainage. It's possible that the drain line between the air gap and the disposer is kinked or partially blocked. Disconnect the hose at both ends and check it. Also remove the hose connecting the air gap to the disposer and check that the disposer's inlet opening is not blocked.
Click to enlarge
A dishwasher air gap prevents a vacuum from forming and keeps wastewater from entering the dishwasher and the water system beyond the house.
http://www.popularmechanics.com/how_to_central/home_clinic/1275531.html
Water Heater
If you have a conventional gas water heater these are the parts of the water heater. (Home-cost.com 2006)
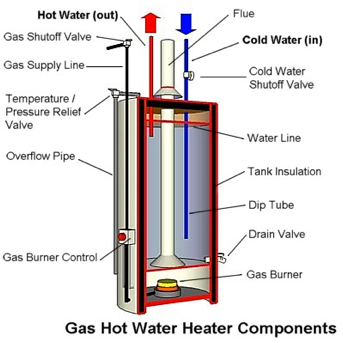
Gas Burner Control Module
The natural gas or propane is supplied by a pipe having its own gas shutoff valve. Just like you need to know where the water supply shutoff valve is located, you need to know where the gas line shutoff is located too. The gas line fees into a gas burner control module that serves as a kind of thermostat for the water heater. It also controls th e ignition of the pilot light.
From the control module we now proceed to the gas burner assembly. This includes the pilot light and gas burner itself. The pilot light and burner adjustment are key to proper and energy efficient operation of the water heater. The gas flame should about 1/2 inch in height and should have blue tips.
Temperature and Pressure Relief Valve
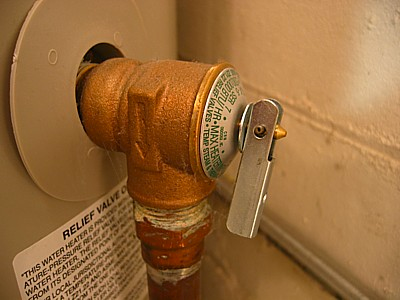 A safety feature of the hot water heater includes the pressure relief valve and discharge pipe. It operates like the radiator cap on your car. The purpose of this valve is to relieve excessive temperature or pressure build up inside the tank if it approaches the limits of the tank's safe design range. This valve is located on top of the tank and often is threaded directly into the tank top itself. To test the valve lift up on the handle slightly and hot water should discharge out of the overflow pipe. A safety feature of the hot water heater includes the pressure relief valve and discharge pipe. It operates like the radiator cap on your car. The purpose of this valve is to relieve excessive temperature or pressure build up inside the tank if it approaches the limits of the tank's safe design range. This valve is located on top of the tank and often is threaded directly into the tank top itself. To test the valve lift up on the handle slightly and hot water should discharge out of the overflow pipe.
http://homerepair.about.com/od/plumbingrepair/ss/hwh_tank_gas.htm
Gas Furnace System Operation & Components
Let’s cover the components and system operation at the same time. On a call for heat at your thermostat an igniter inside your furnace begins to glow. At the same time a small combustion vent blower begins to pull air through your furnace heat exchanger. After a few seconds gas enters your furnace through the gas valve, mixes with the fresh air from the combustion vent blower, hits the igniter and burns inside the heat exchanger. The blower then starts pushing air past the heat exchanger forcing warm air into your home. The exhaust gases vent up through the flue pipe and into the atmosphere. When the thermostat says the house is warm enough it shuts down the furnace. It’s just that simple.
Split-system AC Units
A split-system air conditioner splits the hot side from the cold side of the system, like this:
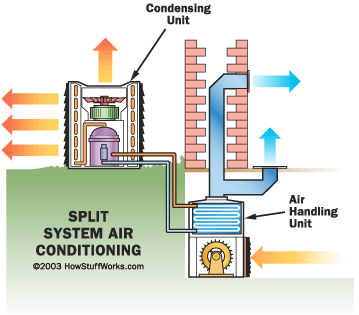
The cold side, consisting of the expansion valve and the cold coil, is generally placed into a furnace or some other air handler. The air handler blows air through the coil and routes the air throughout the building using a series of ducts. The hot side, known as the condensing unit, lives outside the building. In most home installations, the unit looks something like this:
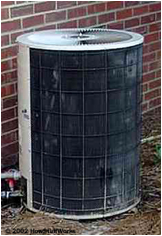 The unit consists of a long, spiral coil shaped like a cylinder. Inside the coil is a fan, to blow air through the coil, along with a weather-resistant compressor and some control logic. This approach has evolved over the years because it is low-cost, and also because it normally results in reduced noise inside the house (at the expense of increased noise outside the house). Besides the fact that the hot and cold sides are split apart and the capacity is higher (making the coils and compressor larger), there is no difference between a split-system and a window air conditioner. The unit consists of a long, spiral coil shaped like a cylinder. Inside the coil is a fan, to blow air through the coil, along with a weather-resistant compressor and some control logic. This approach has evolved over the years because it is low-cost, and also because it normally results in reduced noise inside the house (at the expense of increased noise outside the house). Besides the fact that the hot and cold sides are split apart and the capacity is higher (making the coils and compressor larger), there is no difference between a split-system and a window air conditioner.
In warehouses, businesses, malls, large department stores and the like, the condensing unit normally lives on the roof and can be quite massive. Alternatively, there may be many smaller units on the roof, each attached inside to a small air handler that cools a specific zone in the building.
In larger buildings and particularly in multi-story buildings, the split-system approach begins to run into problems. Either running the pipe between the condenser and the air handler exceeds distance limitations (runs that are too long start to cause lubrication difficulties in the compressor), or the amount of duct work and the length of ducts becomes unmanageable. At this point, it is time to think about a chilled-water system.
http://home.howstuffworks.com/ac3.htm
What Maintenance Can I do Myself?
With the proper maintenance and care, your Carrier equipment will operate economically and dependably. There are a few simple, routine maintenance operations you can do to help ensure the best performance and comfort from your system.
Safety First
Before you perform any kind of maintenance, consider these important safety precautions.
Disconnect all electrical power to the unit before removing access panels to perform maintenance. Please note that there may be more than one power connection switch.
Although Carrier takes special care to prevent sharp edges in the construction of our equipment, it's best to be very careful when you handle parts or reach into units.
Routine Maintenance
Check the air filter in your furnace or fan coil every 3 to 4 weeks. A dirty filter will cause excessive strain on your furnace, air conditioner or heat pump. Replace your filter when necessary, or clean it if you have the reusable type. (If you have a reusable filter, make sure it's completely dry before you re-install it.) The prefilter and collection cells of an electronic air cleaner should be cleaned at least two or three times per year.
Clean dust off of your indoor coil. With a vacuum cleaner and soft-brush attachment, you can remove any dust from the top and underside of the coil. Make sure you only do this when the coil is dry. If you can't get the coil clean this way, call us for service.
Keep your outdoor condensing unit free of debris. If you keep grass clippings, leaves, shrubbery and debris away from your outdoor unit, it should only require minimal care to operate properly. Check the base pan (under the unit) occasionally and remove debris, to help the unit drain correctly. If the outdoor coil becomes dirty, use a brush or a vacuum cleaner with a soft brush attachment to clean the surface. To clean dirt that is deep in the coil, contact Dring.
Take special care of outdoor condensing units in ocean environments. If your unit is located near a sea coast, you can help preserve its optimal condition with a little extra care. Ocean mist and sea breezes carry salt, which is corrosive to most metals. Although new Carrier units are made out of galvanized metal and are protected by top-grade paint, you can add life to your unit by washing all exposed surfaces and the coil approximately every three months. (Ask your installing contractor about the appropriate interval in your area.)
Make sure your outdoor unit stays in a level position. If the support for your split-system outdoor unit shifts or settles and the unit is no longer level, re-level it promptly to make sure moisture drains properly out of the unit. If you notice that water or ice collects beneath the unit, arrange for it to be drained away from the equipment.
Inspect your furnace's combustion area and vent system before each heating season. If you find dirt, soot or rust, your system may not operate properly or at its peak efficiency. Call Dring and do not operate your furnace until it is professionally inspected and/or repaired.
http://www.dring.com/faq/maintenance/myself.asp
Garage Doors
We install Overhead Garage Doors and Windsor Doors
Overhead Doors
Overhead Openers
Windsor Doors
Chamberlin Doors
Windsor Doors
|


;)